Since I
have started to seek relaxation time and my way out of the day to day routine
by crafting, I’ve started bringing out from my storage boxes and drawers all
sorts of potential materials for my future craft projects, so I’m in dire need
of some organization of my craft creation corner.
Besides
that, one of my goals is to stop throwing away so easily the things which, at
first sight, I might think I would not need anymore.
When I
brought the sea coast in my bedroom, I had some scraps of fabric left and I keep
moving them around. So, in the spirit of upcycling, I took one of them out,
laid it on the table and waited to get an idea of what to do with it…
If only I
could make a bag… a purse…a sachet...a “something” to hide all my balls of
yarn…
I don’t
have a sewing machine…I’d get dead bored to sew that much…what if instead of sewing,
I glue….Hmmmm….I’d use up too much fabric glue…
What if I
use a paper stapler? I do have one, but the staples are small…and the
fabric is soft and it would rip away…
And then I
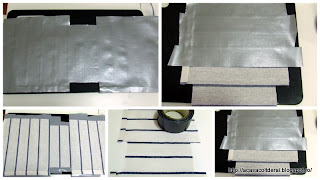
saw the grey duct tape you can see in the photo...I’ve had since I had to do
some house work and the workers needed it for something….Hmmm…if I were to
stick it on the back of the fabric, it would become more firm, I would be able
to staple it and whatever bag would come out, would be able to stand…I think I
saw this idea somewhere….
So I cut
the fabric into two stripes and the wider one became my tester fabric for this
“something” for yarn storage.
Remember that this
fabric used to be a kitchen towel? And as any kitchen towel, it had a hook,
a tag to hang it with. I removed that and saved it to use it later.
I folded
the fabric in half and put a rectangular box in it just to figure out how big
and wide the bag would be…
The bottom
margins of the fabric, those on the sides of the box, I cut out, as that’s
where the fabric fold would be.
I then cut
out the extra duct tape on the edges of the fabric.
I folded
again the taped fabric in half and I started to staple on the edges, leaving
a seam of about 1 cm…
I opened up
the seam in an attempt to remain unfolded so I could duct tape it too. I even
tried with the meat hammer…no, I didn’t beat the crap out of the seam (although
the idea crossed my mind) but I have tried to press it open.
No success.
So I just
duct taped it.
I applied
the same treatment to the bottom corners.
It started
to look like a bag….
I wanted to
be able to close it, with a flap; otherwise the Big Black would most certainly
play some football with my yarn balls.
I took the
second stripe of fabric; I measured it by the eye to fit the opening of the
bag, taped it with duct tape and stapled it to one of the edges of the bag.
So this is
how it looked like…
Then I
thought I’d like the flap to have a round finish and the best circle to use to
cut around it…was a plate.
I sew the
hook onto the flap and a button on the front of the bag and that was it!
And until I’ll
be using my yarn balls again, the new bag can be a décor element in my sea
coast and sea shells bedroom.


Niciun comentariu:
Trimiteți un comentariu